Check the headers and params type!
Please note that these calls are done using the header "Content-Type: application/x-www-form-urlencoded" and form-params params.
In these guide will see how sign in inside octorate using APIs. We will do together some flows.
Required knowledge / points:
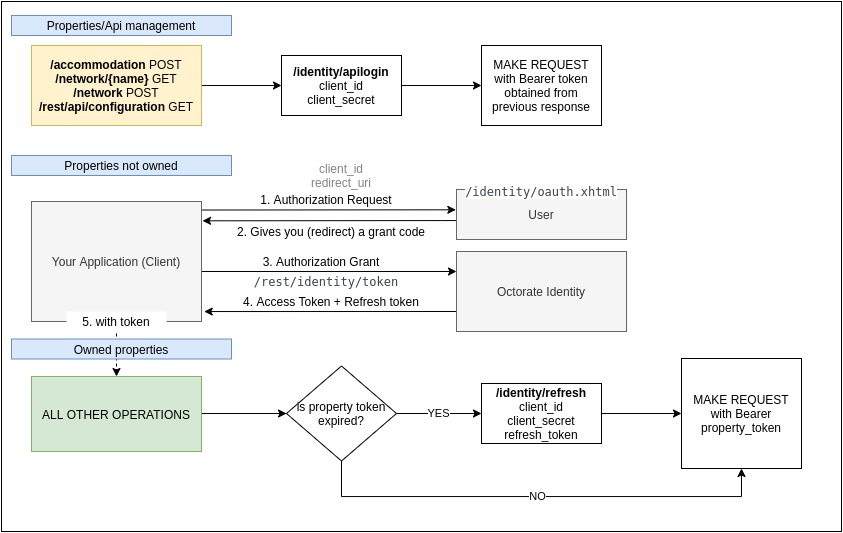
Working with properties/accommodation data(OAuthLogin)Access to properties is granular inside Octorate. That means that every user should give you the grant to access their properties. In that case you should use the oauth flow. When using this authentication method we suppose to receive in header the Bearer token that is generated following the Case 1. Administrator-alike operations(ApiLogin) Sometimes you're application is not accessing existing properties, but you're creating new properties or you're just configuring you api details. In this case you're allowed to skip the oauth flow and obtain a Bearer token valid for these operations. |
|
Octorate API uses the OAuth 2.0 Protocol
either for authentication and authorization.
This is a way to obtain authorization to access the resources directly from the user when
he's available inside your application.
We do not support other authentication methods.
To begin, your application requests needs an access token.
Your application have to redirect the user to our identity WEB page trough a web browser.
So we expect you to perform a redirect to this url.
Let's see how the oauth flow is done.
https://admin.octorate.com/octobook/identity/oauth.xhtml?client_id=aaaaaaaaaaaaaaaaaaaaaaaaaa&redirect_uri=https%3A%2F%2Fwww.mycompany.com%2Foauth_end.html&state=something_crypted
Now you can do you server to server calls to retrieve the credentials.
Have you not still set the redirect uri?Please note that these calls are done using the header "Content-Type: application/x-www-form-urlencoded" and form-params params.
You need to call the endpoint /identity/token to retrieve a valid refresh and access token
This should be done in maximum one minute after we have redirect the user to your site. This action MUST be done server to server. You call Octorate Identity Repository to retrieve these tokens.
                            curl --location --request POST
                            'https://{{enviroment}}/rest/{version}/identity/token'
                            \

                            --data-urlencode 'client_secret={{yoursecret}}' \

                            --data-urlencode 'client_id={{clientid}}' \

                            --data-urlencode 'redirect_uri={{https://your_redirect_uri.com}}'
                            \

                            --data-urlencode 'grant_type=code' \

                            --data-urlencode 'code={{code provided}}
{
    "access_token":"token",
    "refresh_token":"myrefreshtoken",
    "expireDate": "2020-03-17T17:41:51.178Z"
}
The response here gives you the refresh_token that can be used to obtain a new token, and the access_token that you will use in your requests with header:
HTTP HEADER: “Authorization”: “Bearer {{access_token}}”
In order to obtain a new valid token you should call /identity/refresh method
The response will be like this:
                                {
                                "access_token":"token",
                                "expireDate": "2020-03-17T17:41:51.178Z"
                                }
You can simply execute a post with your secret and client id. Please do this always server to server
                                curl --request POST 'https://{{enviroment}}/rest/{version}/identity/apilogin'
                                \
                                --header 'Content-Type: application/x-www-form-urlencoded' \
                                --data-urlencode 'client_id={{yourclient}}' \
                                --data-urlencode 'client_secret={{theSecretKey}}'
You will get a response like this
                            {
                            "access_token":"token",
                            "expireDate": "2020-03-17T17:41:51.178Z"
                            }
You can use this token for creating properties adding this header to your call. HTTP HEADER: “Authorization”: “Bearer {{access_token}}”